
Your Stream Brothers video channel is managed on the Streaming page of your account: the settings your encoder needs, whether you are live and who is watching, your player and embed code, restreaming, and for TV stations the media library, playlists and weekly schedule. This tutorial walks through each screen with pictures.
The pictures show a made-up TV station called harborlightstv. Your own server address, stream name, username and links appear in the same places on yours. Copy them from your account, never from these pictures.
Contents
1. Find your channel
Sign in and click Streaming in the left menu of your account. The page opens with My Services: every video service on your login, whether it is live, how many people are watching against your limit, and the bandwidth and storage it uses. Click the service's name to open it.
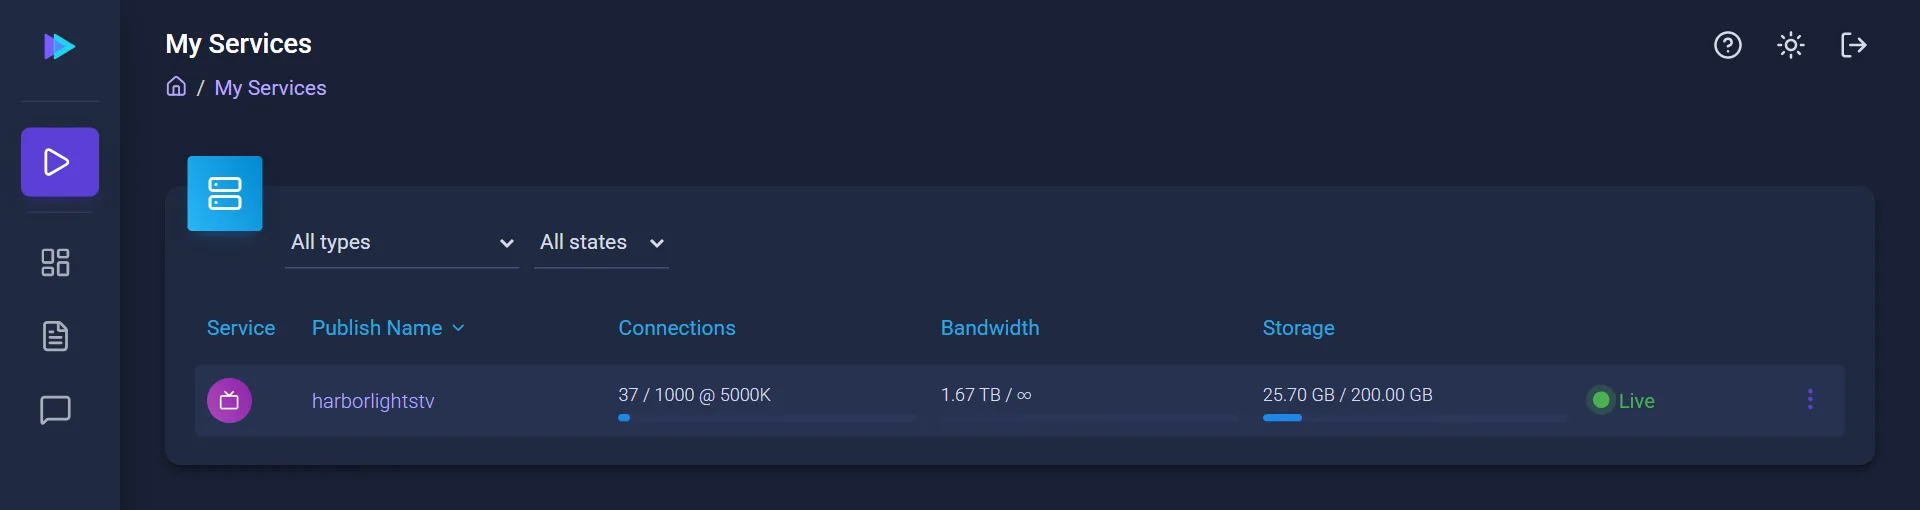
If you have more than one account with services, pick the account in the menu at the top right of the page.
2. The Overview: live or not, and who is watching
A service opens on its Overview. At the top right you see Service Online and, while an encoder is sending, a green LIVE badge, with buttons to restart or stop the service. Below are your viewers against your limit, the bitrate coming in, the storage and traffic used, and a live preview of your stream. The menu on the left leads to everything else in this tutorial.
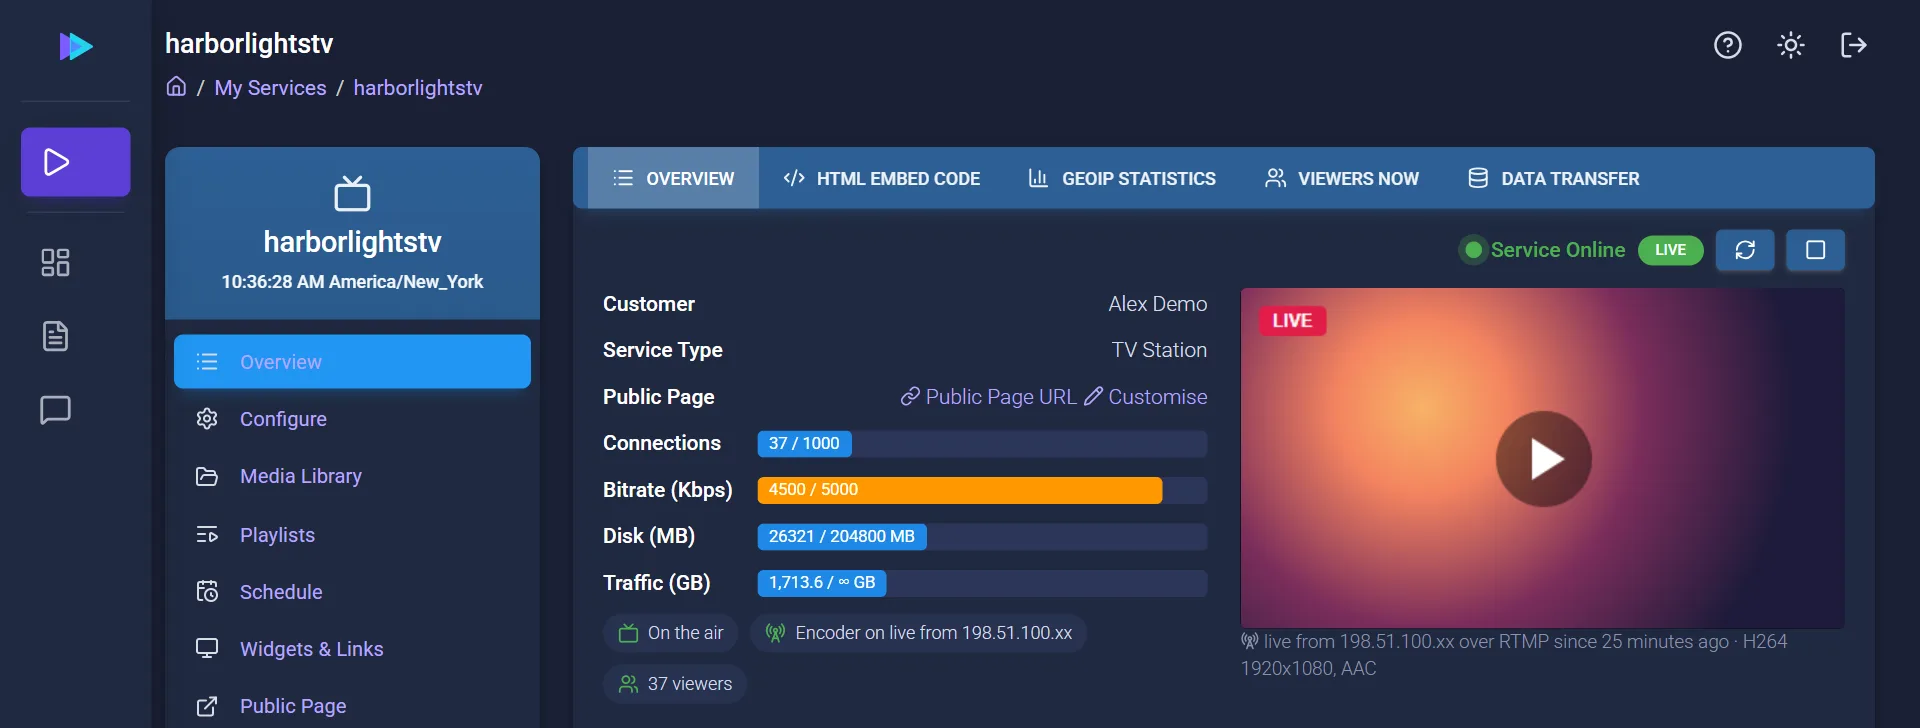
The tabs above the Overview add more: Viewers Now lists everyone watching at this moment, GeoIP Statistics shows where they watch from, and Data Transfer shows your traffic. How many viewers you can have at once depends on your plan: 10 on the free plan, and up to 1,000 on Pro and Platinum.
Now playing (TV stations)
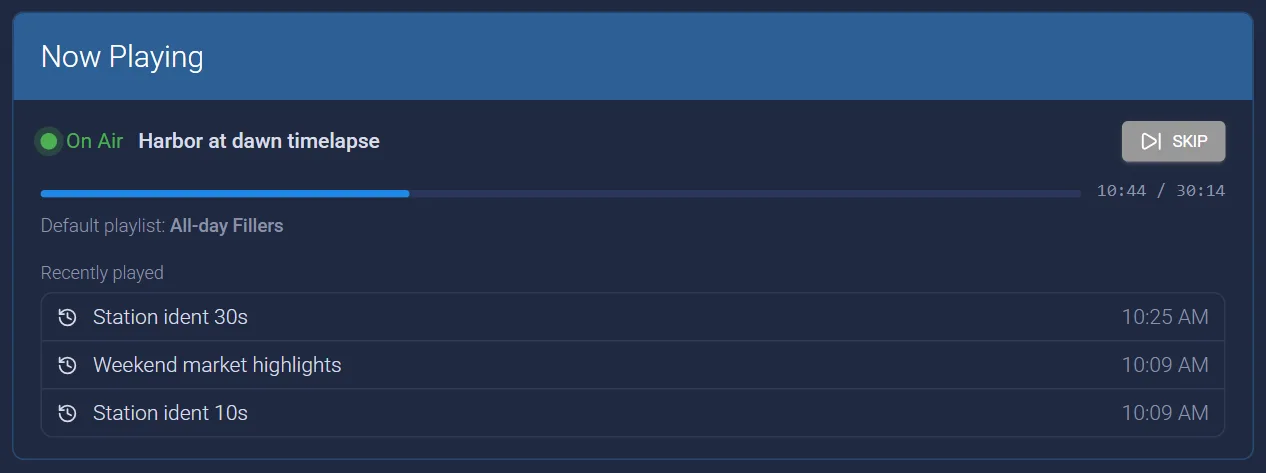
A TV station plays its schedule around the clock. Now Playing on the Overview shows the file on the air, how far through it is, which playlist it comes from, and what played before. Skip moves on to the next file.
3. Your encoder settings
Further down the Overview, the Live stream to service box has everything your encoder (OBS Studio, vMix, Wirecast, FFmpeg or a hardware encoder) needs. Each line has a copy button: copy the values rather than typing them.
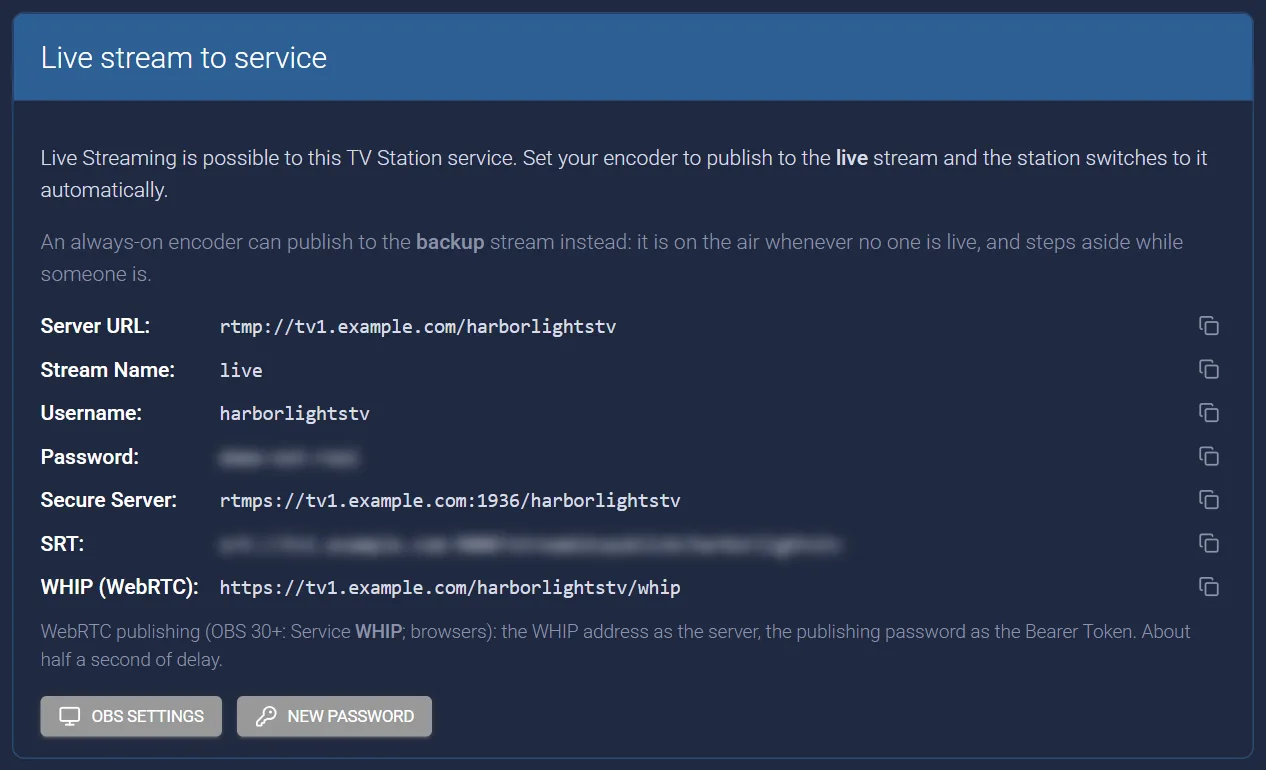
- Server URL
- The RTMP address your encoder sends to.
- Stream Name
- The name of the stream. Some encoders call it the stream key.
- Username and Password
- Your channel's publishing login. This is not the email and password you sign in to Stream Brothers with. The password is blurred: click it to see it.
- Secure Server
- The same server over an encrypted connection (RTMPS), for encoders that support it.
- SRT
- Where shown, an address for sending over SRT, which keeps a stream steady on long or unreliable connections.
- WHIP (WebRTC)
- For OBS Studio 30 or newer and browser encoders: choose the WHIP service, paste this address as the server, and use your publishing password as the Bearer Token. WebRTC has about half a second of delay.
OBS settings shows exactly what to enter in OBS Studio, step by step. New password makes a new publishing password; encoders using the old one are disconnected and need the new one, so use it if you think someone else has your password.
On a TV station, publish to the stream name live and the station switches to your live show automatically, then goes back to its schedule when you stop. An always-on encoder can publish to backup instead: it is on the air whenever no one is live, and steps aside while someone is.
Step-by-step setup for each encoder: OBS Studio, vMix, Wirecast and FFmpeg. Pro and Platinum take up to 5 Mbps at 1080p.
4. Your player and embed code
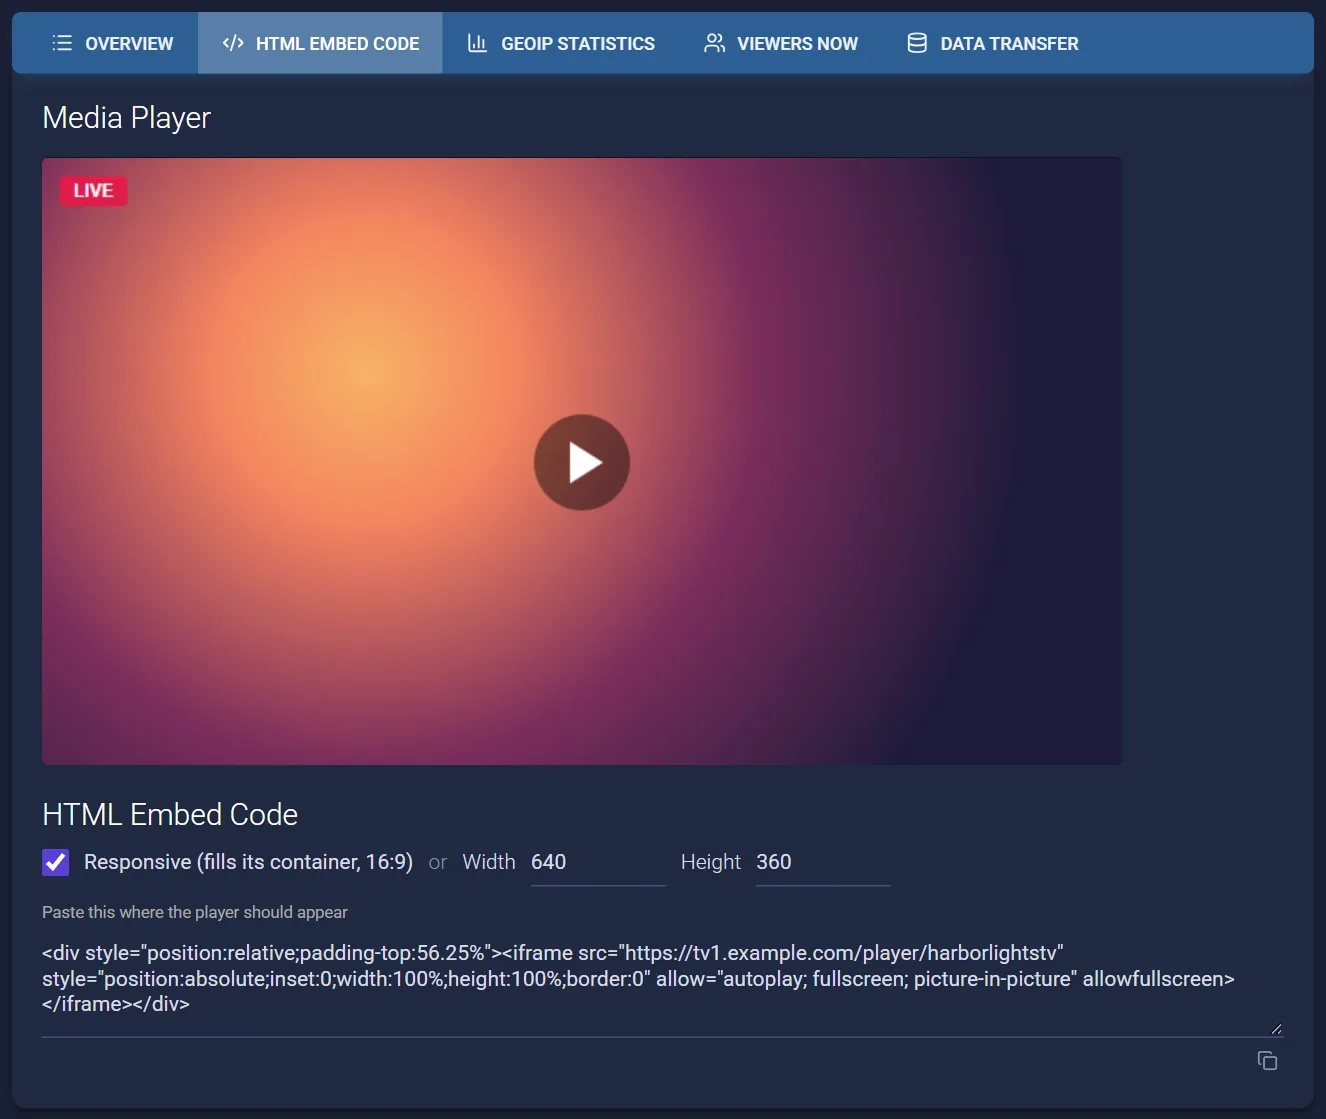
Open the HTML Embed Code tab at the top of the Overview. It shows your player as your viewers will see it, and the code that puts it on your own website. Leave Responsive ticked to make the player fill the width of the place you paste it, or set a fixed width and height. Copy the code with the button under it and paste it into your page.
5. Restream to YouTube, Facebook and others
Stream Targets in the left menu sends your stream to YouTube, Facebook, Twitch, X or any RTMP server at the same time as your channel. Click Add stream target, pick the platform, and paste the stream key it gives you. While you are live, each target shows whether it is sending; switch one off with its Enabled switch, or edit and remove it from its menu.
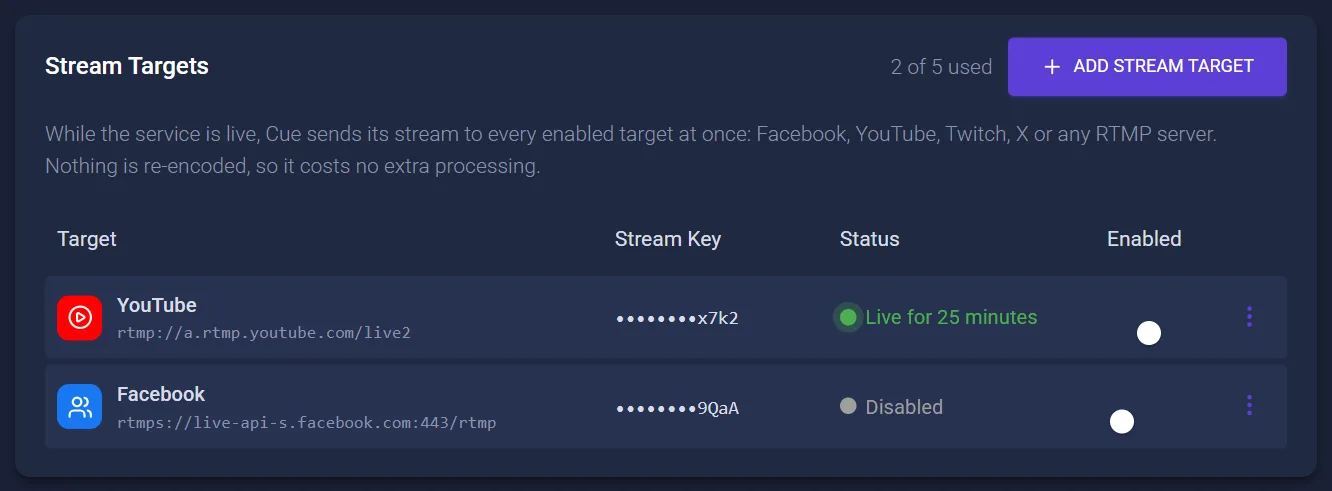
Nothing is re-encoded, so restreaming does not change the quality your own viewers get.
6. Media Library
Pro and Platinum come with a video library: 50 GB on Pro and 200 GB on Platinum. Media Library holds your files in folders. Click Upload or drop files onto the page, and use New Folder to keep them organised. The meter at the top shows how much space you have used.
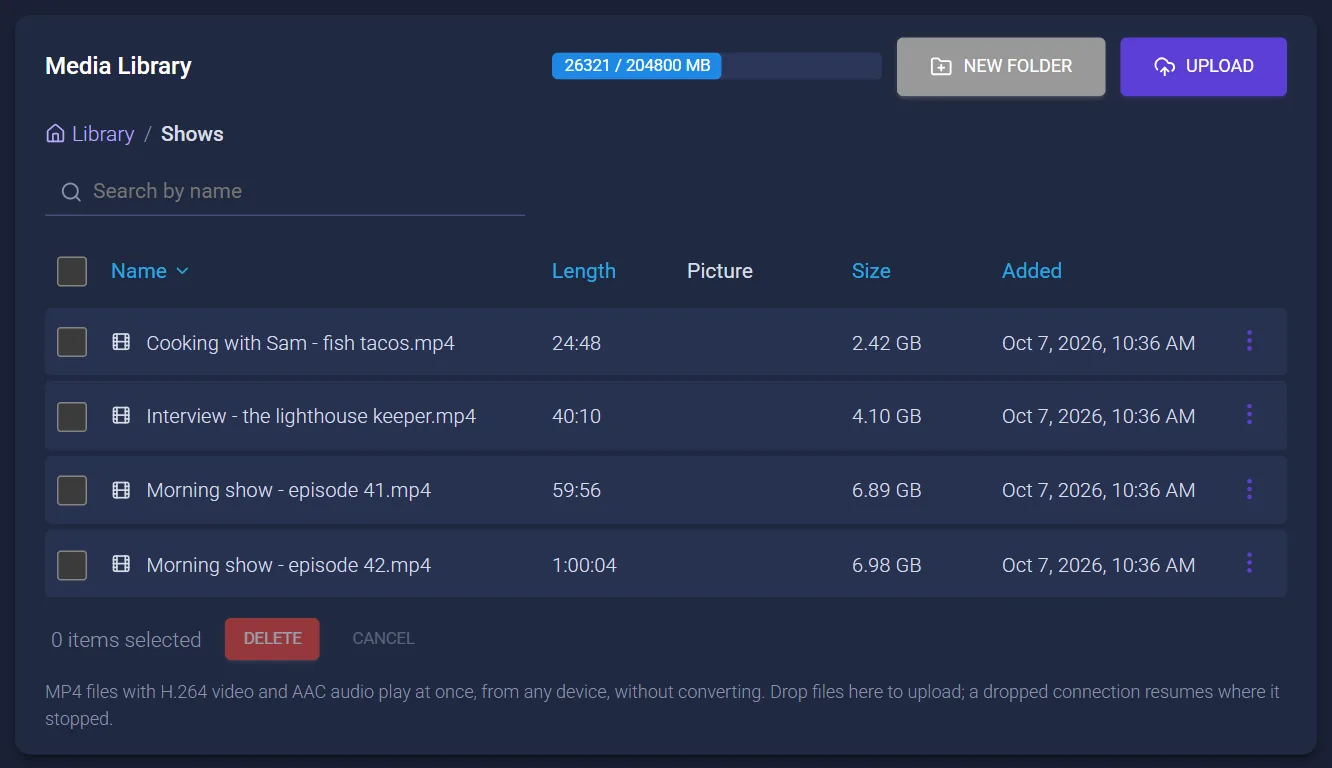
Files are not converted, so export them first as MP4 with H.264 video and AAC audio, up to 1080p: those play at once on every device. A dropped connection during an upload carries on where it stopped.
7. Playlists and the schedule (TV stations)
Playlists
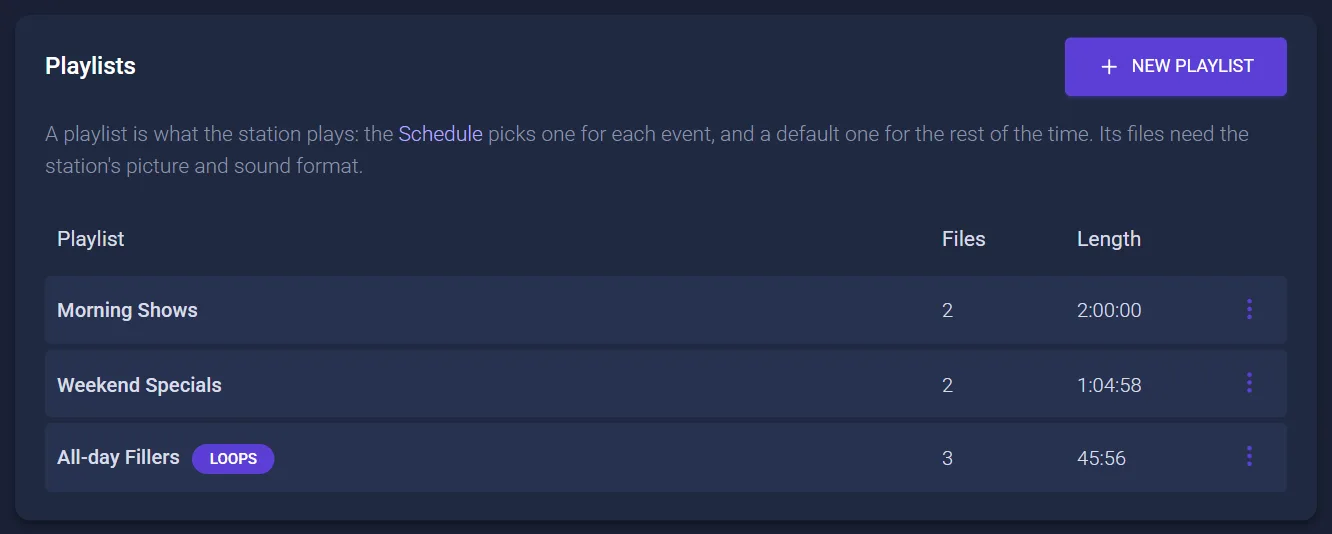
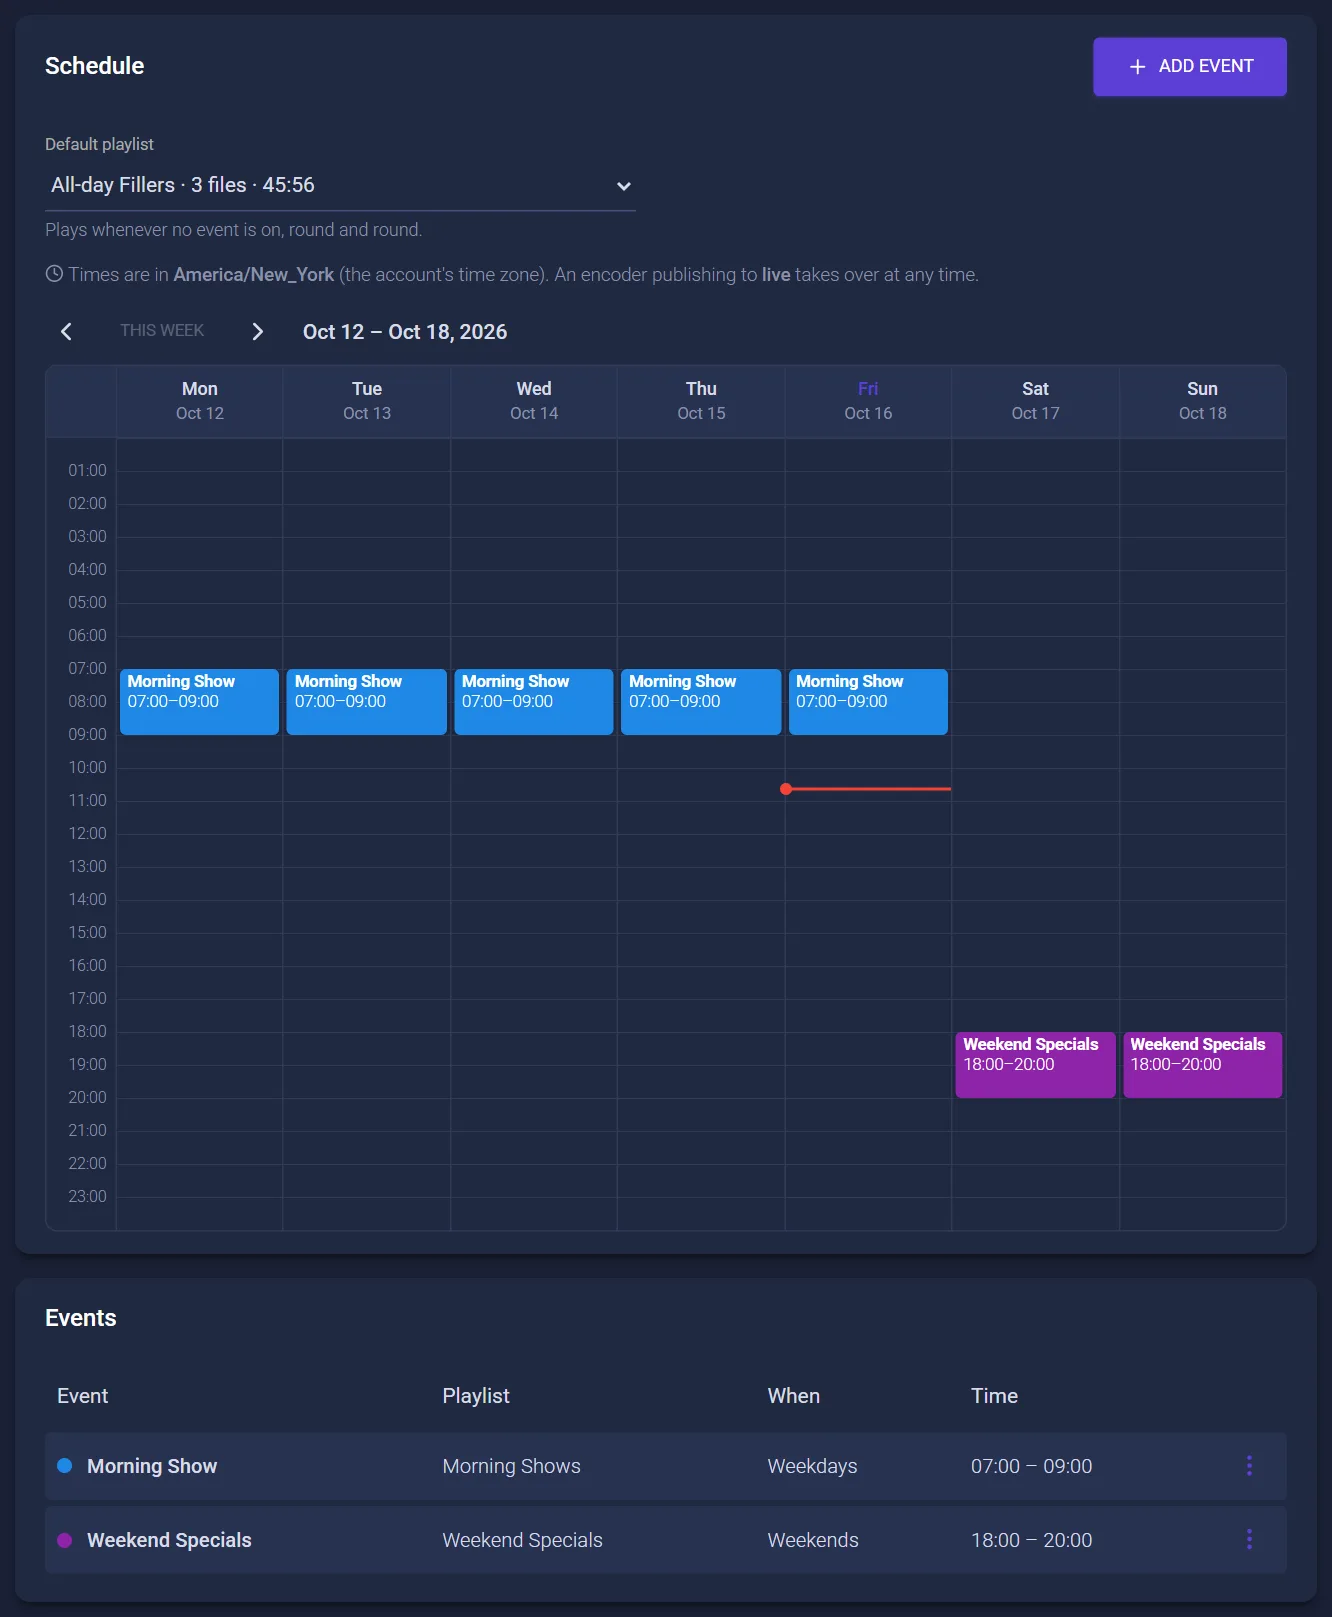
A playlist is a list of files played one after another. On a TV station the schedule picks a playlist for each show, and a default playlist plays the rest of the time. Click New Playlist, name it and add files from your library; a playlist set to loop starts again when it ends.
Schedule
Schedule shows your week. Choose the Default playlist that plays whenever nothing else is on, then click Add event to play a playlist at set times: every week on chosen days, or once on a date. Times are in your account's time zone, and a live encoder takes over at any time.
8. Widgets & Links
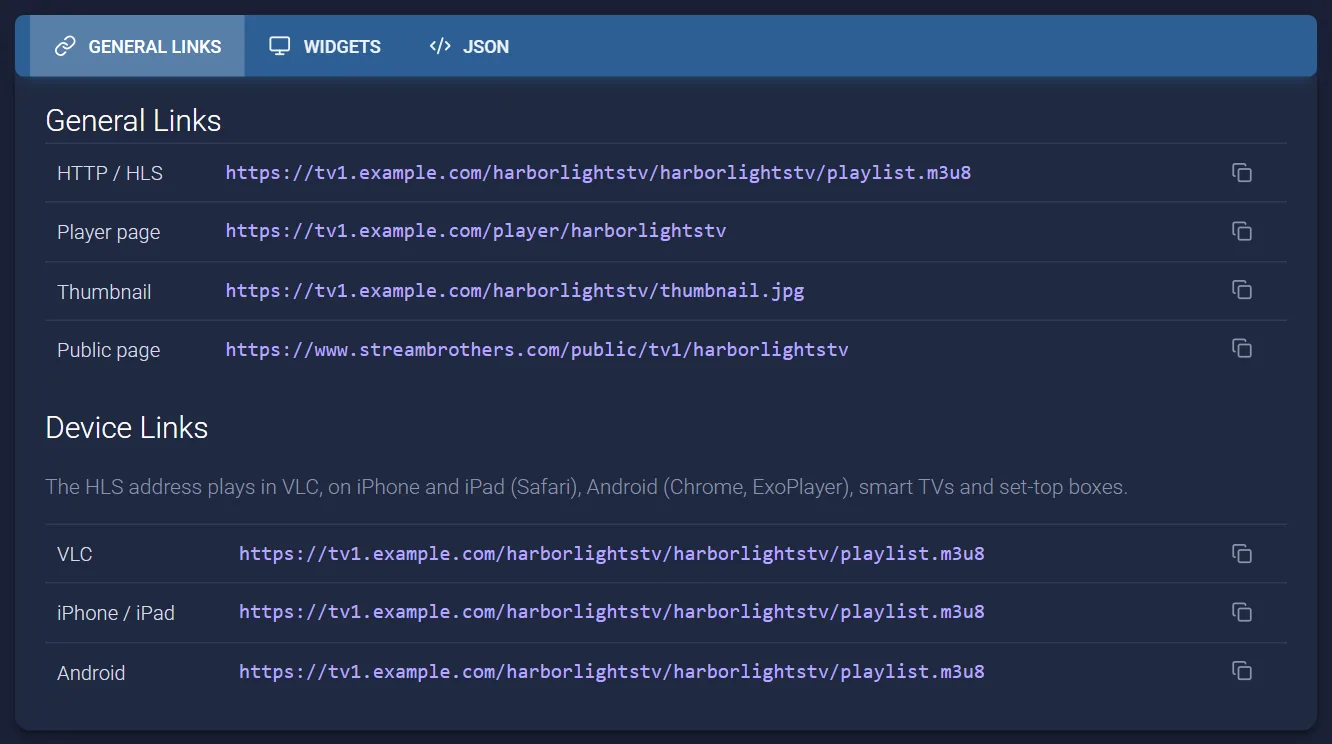
Widgets & Links has every address for your stream: the HLS link that plays in VLC, on phones, smart TVs and set-top boxes, the player page, a thumbnail image, and your public page. The Widgets tab has small status and viewer-count widgets for your website, and JSON has a link to your live figures for your own apps.
9. If something does not work
- No LIVE badge after you start your encoder: re-copy the Server URL and Stream Name, and check you used the channel's publishing Username and Password, not your account login. If you made a new password, update it in your encoder too.
- Viewers buffer: lower your encoder's bitrate, and set its keyframe interval to 2 seconds. Your upload speed should be at least twice what you send.
- The player does not show on your website: use the embed code from the HTML Embed Code tab as it is.
- Still stuck? Start a chat with us from any page, or open a ticket from your account. We can see whether your encoder reached the server and why it was turned away.